The frustrating version of an iPhone photo often appears after you take it.
For a fraction of a second, the preview looks natural. Then the saved image brightens the shadows, hardens the edges around hair or trees, deepens the blue sky and gives skin a texture you did not see when you pressed the shutter. Search for a hidden “auto-enhance” switch and you enter a maze of advice that confuses exposure, HDR, Photographic Styles, ProRAW and editing.
Here is the short answer: there is no universal switch in Apple’s Camera app that turns off all computational photography. You can change how the result is rendered. You can preserve more information for editing. You can choose another capture pipeline. But each option controls a different part of the problem.
This guide shows what is actually adjustable—and where the iPhone keeps making the decision for you.
For the wider system behind these trade-offs, read our phone camera specifications guide, covering sensors, lenses, focus, exposure and processing.
Quick answer: what can you actually control?
| Control | What it can change | What it cannot promise | Best use |
|---|---|---|---|
| Exposure before capture | Overall brightness and highlight protection | It does not disable frame merging, sharpening or tone mapping | Bright skies, signs and high-contrast scenes |
| Photographic Styles | Tone, color, warmth and intensity on supported models | It is not an “off” switch for computational photography | Everyday JPEG/HEIF photos that look too punchy |
| 12MP, 24MP or 48MP mode | Output resolution on supported cameras | More pixels do not automatically mean more natural detail | Daylight detail and cropping flexibility |
| Apple ProRAW | More latitude for exposure, color and local edits | It still incorporates Apple’s image processing | Important photos you expect to edit |
| Editing in Photos | Highlights, shadows, contrast, saturation and definition | It cannot reliably reconstruct clipped or altered source detail | Correcting a saved image that is close to usable |
| Third-party camera | A different or more lightly processed capture pipeline | It may give up convenience, dynamic range or instant consistency | Users who prefer natural texture and accept manual work |
Buying rule: do not upgrade your iPhone merely because another model promises a “more advanced” camera pipeline. First determine whether your objection is to the hardware, Apple’s rendering taste or a setting you can already change.
Why do iPhone photos look different after taking them?
An iPhone does not necessarily save the single frame you saw at the instant of capture. Depending on the model, mode and scene, the camera system can use multiple exposures and processing stages to produce the final file. Those stages may include frame alignment, subject selection, noise reduction, local sharpening, color rendering and tone mapping.
That delay explains the familiar before-and-after effect:
- The viewfinder gives you a responsive preview.
- You press the shutter, while the camera retains information from adjacent moments.
- The system aligns and combines usable data.
- It makes local decisions about faces, skies, shadows and texture.
- Photos displays the finished HEIF, JPEG or ProRAW rendering.
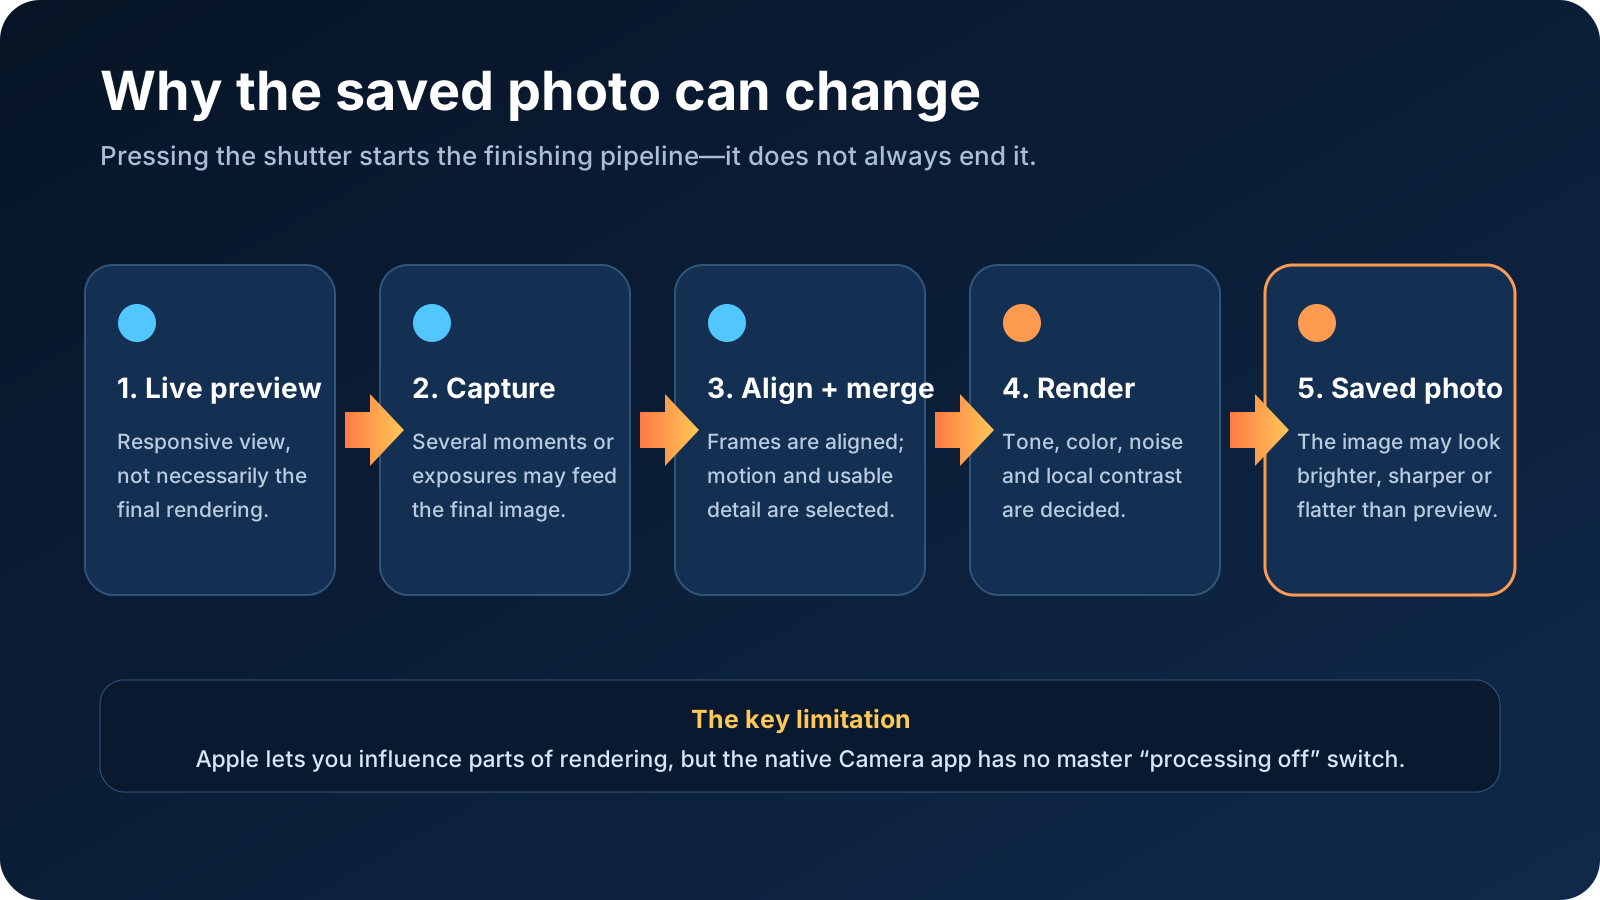
Computational photography is not inherently bad. It can hold detail in a bright sky while keeping a face visible, reduce noise in dim rooms and rescue a handheld photo that a single tiny-sensor exposure would struggle to capture. The downside is that the camera optimizes for a broadly appealing result, not necessarily your preferred one.
When judging texture, our megapixels guide explains why a larger output grid or strong edges do not by themselves prove additional usable detail.
The four overprocessing symptoms—and the control that matches each
“Overprocessed” is too vague to troubleshoot. Identify what changed first.
| What you see | Likely processing signature | First control to try | When that will not be enough |
|---|---|---|---|
| Shadows look unnaturally bright; the image feels flat | Aggressive tonal compression or HDR rendering | Reduce exposure slightly before capture; try a lower-tone Photographic Style | When local tone mapping still lifts selected areas |
| Hair, leaves, fabric or pet fur look crunchy | Sharpening plus noise reduction or imperfect frame merging | Compare standard capture with ProRAW in good light | When the native pipeline has already altered fine texture |
| Skin looks too warm, cool or locally inconsistent | White balance, semantic rendering and mixed light | Adjust Style warmth/tone; move away from mixed lighting | When different parts of the face are lit by different sources |
| The photo changes a second after capture | The saved result has completed more processing than the preview showed | Compare the same scene in standard, ProRAW and a lighter-processing app | There is no native “freeze the preview” control |
This symptom-first approach also keeps you from making the photo worse. Lowering saturation will not fix sharpening halos. Pulling down highlights will not restore texture that noise reduction has smeared. Adding grain may disguise a plastic surface, but it does not reverse the underlying processing.
For the HDR part of this problem, our phone camera HDR guide separates tone rendition, moving-edge artifacts and changes caused by the file or viewer.
For a shared yellow, blue or green cast, start with phone white balance and mixed-lighting checks. That guide distinguishes neutral references and WB controls from saturation, tone and sharpening.
Photographic Styles: useful influence, not a true off switch
Apple’s Photographic Styles guide says supported iPhones let you adjust tone, color, warmth and the strength of a style. That makes Styles the best first step when standard photos consistently look too contrasty, too warm or too vivid.
Start conservatively:
- Choose the most neutral/default-looking style available on your model.
- Reduce Tone a little if faces and textured surfaces look harsh.
- Adjust Warmth only when color is the actual problem.
- Test one change against the same scene instead of changing three sliders at once.
- Reset the style if you can no longer tell whether the camera or your preset caused the look.
Styles alter rendering; they do not give you an unprocessed sensor dump. They also vary by iPhone generation and iOS version. A recipe copied from another model may not produce the same result on yours.
Exposure is the fastest control—and the easiest to misunderstand
If a bright window or sky makes the final image look strangely flattened, tap the important area and drag the exposure control downward before capture. Protecting the highlights can give the tone-mapping system less reason to pull every part of the scene toward the middle.
But underexposure is not a universal cure. Push it too far and the camera must lift dark regions later, revealing noise or muddy color. The aim is not to make the preview dark; it is to protect the part of the scene you do not want clipped.
Use exposure compensation when brightness distribution is the problem. Do not expect it to remove sharpening, frame fusion or subject-aware processing.
Does ProRAW stop iPhone photo processing?
No—and the name causes confusion.
Apple describes ProRAW as combining a standard RAW format with iPhone image processing. Apple’s developer session on capturing and processing ProRAW discusses the computational data retained in the file. In practical terms, ProRAW offers substantially more editing latitude than an ordinary HEIF or JPEG, but it is not the same as bypassing Apple’s pipeline.
Use ProRAW when:
- the photograph matters enough to edit deliberately;
- highlights and white balance need room for correction;
- you want more control over local contrast and texture;
- storage and editing time are acceptable costs.
Avoid making it the automatic answer when:
- you want small files and effortless sharing;
- you rarely edit;
- the subject is moving quickly and consistency matters more than latitude;
- storage is already tight;
- your complaint is mainly composition or poor light rather than processing.
Apple’s ProRAW support page explains how to enable it on supported Pro models. Availability and resolution depend on the device and selected camera. Apple’s advanced camera settings also distinguish 12MP, 24MP and 48MP options on supported models.
More resolution is not an antidote to overprocessing. A 48MP file can preserve more spatial information in favorable light, but motion, lens limits, noise and processing still determine whether that information is useful.
If you are choosing a capture setting, use our 12MP versus 48MP photo-mode guide to compare the same format at equal output size, then inspect corresponding texture. It separates resolution from RAW editing and includes 24MP defaults.
Can you turn off iPhone computational photography completely?
Not through one native Camera setting. The honest control map looks like this:
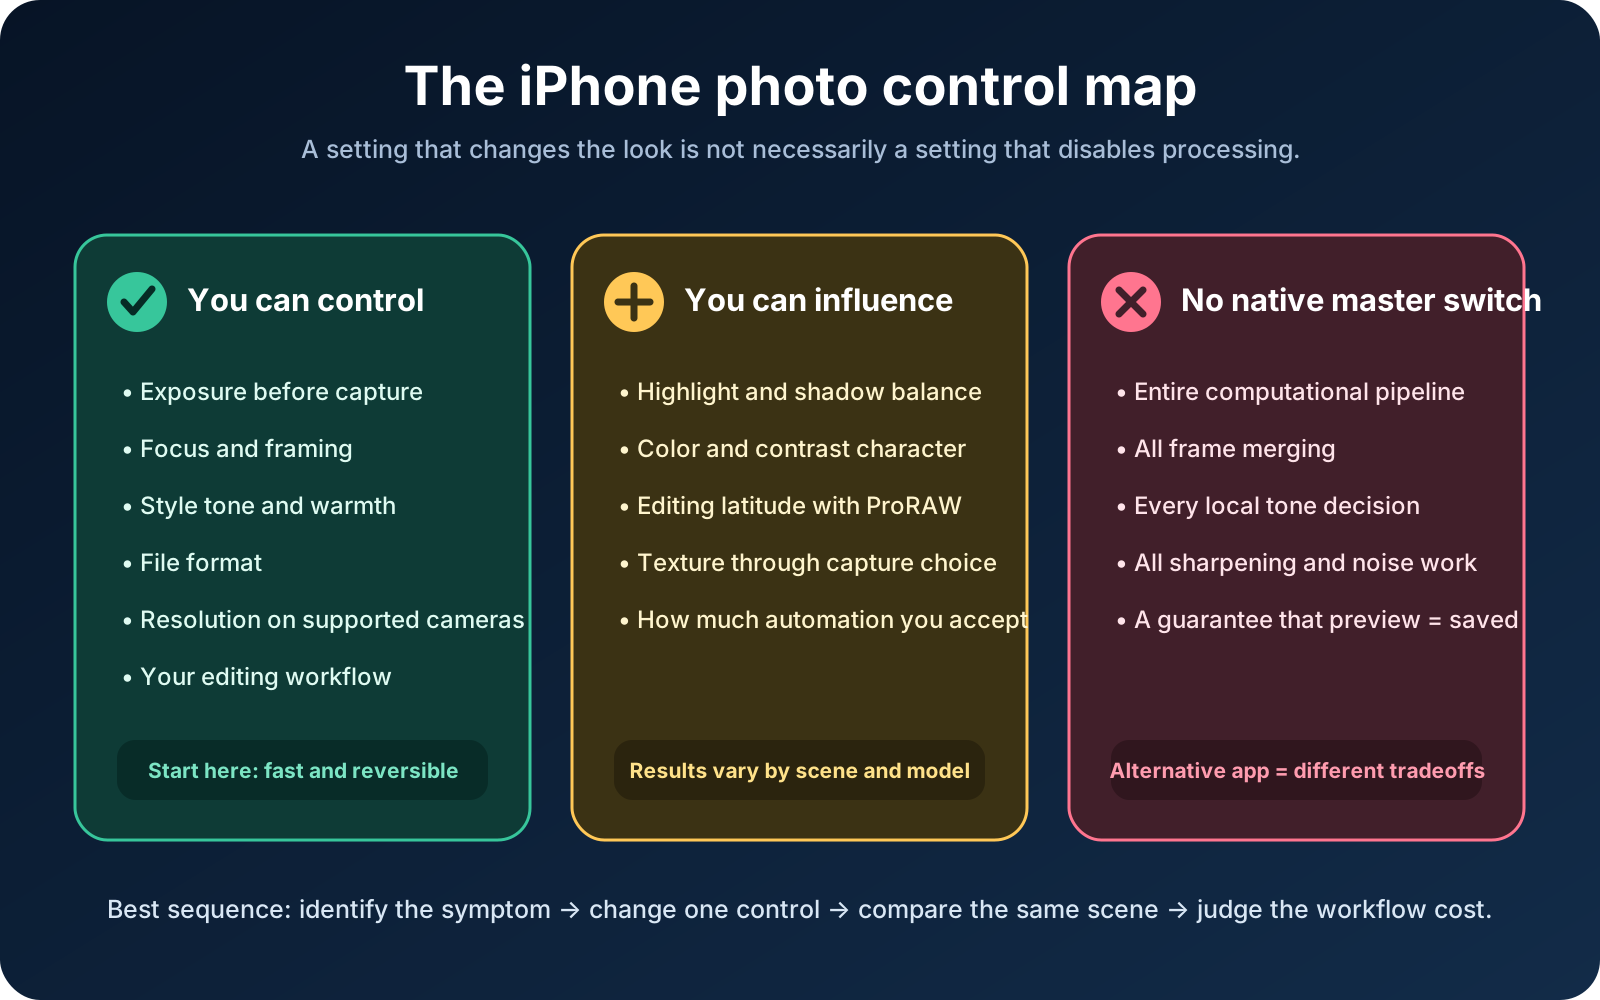
That distinction matters because many “turn off auto-enhance” tutorials promise more than the setting can deliver. Turning off scene detection on an older iOS version, changing a style or selecting RAW may change the output, but none should be described as a guaranteed master switch across every current iPhone.
Third-party cameras: the real escape hatch has tradeoffs
If you dislike the native rendering even after adjusting tone and exposure, a third-party camera can use a different capture strategy.
Halide’s Process Zero is designed to skip the standard iPhone image-processing system and produce a more lightly processed result. That can preserve a more natural relationship between texture, noise and contrast. The tradeoff is the point: less computation can mean less highlight recovery, more visible noise and a smaller safety net when light is poor.
Adobe Project Indigo takes another route. It remains computational photography, but uses Adobe’s own multi-frame pipeline and aims for a more natural, camera-like rendering. It is an alternative interpretation, not “no processing.”
| Capture path | Processing character | Main advantage | Main downside |
|---|---|---|---|
| Apple Camera, standard HEIF/JPEG | Highly automated and optimized for immediate use | Fast, consistent, share-ready | Limited control over the full pipeline |
| Apple Camera, ProRAW | Apple computation plus a more editable file | Recovery and editing latitude | Large files and added workflow |
| Halide Process Zero | Minimal/lighter processing approach | Natural texture and predictable grain | Less computational rescue in difficult light |
| Adobe Project Indigo | Alternative multi-frame processing | More restrained rendering with computational benefits | App compatibility and behavior can vary by device/version |
Do not replace a reliable camera workflow after comparing one attractive daylight shot. Test faces, pets, foliage, backlight, indoor motion and night scenes. The “natural” option may win on texture and lose the moment when a child moves.
A five-minute test to find your actual problem
Use one difficult scene: a person beside a bright window, wearing textured clothing, with hair and foliage or fine objects in the frame.
Take four photographs without changing position:
- Standard Camera with your current settings.
- Standard Camera with a neutral style and slightly lower exposure.
- ProRAW, if your model supports it.
- A reputable third-party camera using its lighter-processing mode.
Then compare the files at normal viewing size before zooming in. Ask:
- Does the face still look believable?
- Are sky and window highlights preserved without gray, flat shadows?
- Does hair look like strands or etched lines?
- Does fabric retain texture without turning gritty?
- Did any option miss focus or motion?
- Would you accept its storage and editing cost every day?
The last question is essential. A technically cleaner file that you never edit is not automatically a better ownership outcome.
What this means for iPhone 18 Pro buyers
The iPhone 18 Pro introduces a 48MP variable-aperture main camera, but a new optical control does not automatically change Apple’s rendering philosophy. Aperture can alter the light reaching the sensor and influence depth of field; processing still determines how multiple exposures, texture, faces and highlights appear in the saved image.
Our iPhone 18 Pro variable-aperture analysis explains why the feature needs matched-scene testing. The broader iPhone 18 Pro downside review tracks camera consistency alongside battery, thermals and modem behavior. Current owners should use the iPhone 18 Pro vs iPhone 17 Pro comparison before assuming a new camera generation will automatically produce a more natural photograph. If the camera is only one part of your decision, start with the iPhone 18 Upgrade Guide.
The question is not whether the newer pipeline is “better” in the abstract. It is whether it fixes the repeated failure mode you notice without adding a workflow you will abandon.
If you are also comparing aperture specifications, read our phone camera aperture guide. It explains physical opening and Portrait blur separately, and why changing the light budget does not by itself resolve aggressive rendering.
The practical hierarchy of fixes
Use the least disruptive fix that solves the visible problem:
- Improve the light and clean the lens. Processing exaggerates weak source material.
- Set exposure for the highlights you care about. This changes capture, not merely the edit.
- Tune Photographic Styles gently. Use it for recurring tone and color preferences.
- Edit the standard file. Enough when the result is close and the source detail survives.
- Use ProRAW selectively. Best when the photograph justifies deliberate editing.
- Test an alternative camera pipeline. Worth it when native rendering itself is the problem.
Verdict
You can make iPhone photos look less processed, but only after naming the symptom correctly. Photographic Styles influence tone and color. Exposure can protect important highlights. ProRAW provides more editing latitude while retaining Apple processing. A third-party app can move further away from the native look, but it also gives up some of the computational safety net that makes phone cameras dependable.
For most people, the best balance is a neutral Photographic Style, careful exposure and standard capture for everyday moments, with ProRAW reserved for photographs worth editing. If crunchy texture or aggressive HDR remains visible in repeated scenes, compare a lighter-processing camera app before spending money on a new iPhone.
The uncomfortable truth is also the useful one: you control the workflow, but Apple still controls much of the native pipeline.
If zoomed photos look worse rather than merely overprocessed, the capture method may be the bigger limit. Our optical-quality zoom vs optical zoom guide explains when a phone is using a native telephoto lens, a 48MP center crop or reconstructed digital zoom. Then compare a 2x optical-quality crop with a real telephoto to see why low light, motion and further cropping can expose losses that sharpening cannot restore.
Before buying different hardware, read what a larger phone camera sensor can and cannot improve. It separates capture potential from focus, motion and the rendering of the saved photo.
Sources and disclosure
This is a research-based guide, not a hands-on comparison of every supported iPhone. Native controls were checked against current Apple Support and Apple Developer documentation. Alternative capture approaches were checked against their developers’ published descriptions. Features and menu paths vary by iPhone model, camera and iOS version; verify availability on your own device.